一、Rest 和 RESTful
REST 是 Representational State Transfer 的缩写,简单翻译便是表述性状态转移,是由 Roy Thomas Fielding 博士于2000年提出的概念。
其实,REST是Web服务的一种架构风格,再言之,是一种设计风格,也就是一种思想,而并非一种标准。
通常,REST基于使用 HTTP, URI 和 XML, JSON 以及 HTML 这些现有的广泛流行的协议和标准。
而 RESTful,可以简陋翻译成 REST 式,RESTful Web Service是一种常见的REST的应用,是遵守了 REST 风格的 Web 服务,并且是 ROA (面向资源的架构)。
REST 架构之中有一条很重要的原则就是:网络上的所有事物都可以被抽象为资源,理解这一点很关键。</p>
二、资源操作
当我们欲对一个 User 资源进行 CRUD 操作的时候,最常见的便是直接在 URL 内体现透彻,并且发出的都是 GET 或 POST 请求,如:
http://127.0.0.1/user/query/1 GET 查询
http://127.0.0.1/user/save POST 新增
http://127.0.0.1/user/update POST 修改
http://127.0.0.1/user/delete GET/POST 删除
而采用 RESTful 进行编写的时候就会情不自禁采用如下方式:
http://127.0.0.1/user/1 GET 查询
http://127.0.0.1/user POST 新增
http://127.0.0.1/user PUT 修改
http://127.0.0.1/user DELETE 删除
转变点在于,我们的 URI 清晰明朗,所有的请求都围绕着我们的 user 资源,而具体的操作则体现在请求方式和参数上面,后面会详细说明。
另外,响应的设计上面也会有所变动,但是围绕不变的原则点是:</p>
Content body 仅仅用来传输数据,此举在于保证数据拿来即用的原则,而并不需要进行“拆箱”
描述数据或者请求的元数据放在 Hearder 中,如 X-Restful-Fields
1 | 响应示例: |
/
说明:商品操作相关controller
/
@Controller
@RequestMapping(“item”)
public class ItemController {
// 注入service
@Autowired
private ItemService itemService;
/
说明:保存商品
@param item
@param desc
@return
@author CKK
*/
@RequestMapping(method = RequestMethod.POST)
public ResponseEntity
@RequestParam(value = ”desc”) String desc,
@RequestParam(value = ”itemParams”) String itemParams) {
try {
if (StringUtils.isBlank(item.getTitle())) {
// 400 参数不符
return ResponseEntity.badRequest().build(); // TODO 参数校验待完善
}
Boolean saveResult = itemService.saveItem(item, desc, itemParams);
if (saveResult) {
// 201 添加成功
return ResponseEntity.status(HttpStatus.CREATED).build();
} else {
// 500 发送异常
return ResponseEntity.status(HttpStatus.INTERNAL_SERVER_ERROR).build();
}
} catch (Exception e) {
e.printStackTrace();
}
// 500 发送异常
return ResponseEntity.status(HttpStatus.INTERNAL_SERVER_ERROR).build();
}
}1
2
3
4
5
6
7
8
9
10
11
12
13
14
15
16
17
18
19
20
21
22
23
24
25
26
27
28
29
30/**
* 说明:修改商品
* @param item
* @param desc
* @return
* @author CKK
*/
@RequestMapping(method = RequestMethod.PUT)
public ResponseEntity<Void> updateItem(Item item,
@RequestParam(value = "desc") String desc,
@RequestParam(value = "itemParams") String itemParams) {
try {
if (StringUtils.isBlank(item.getTitle())) {
// 400 参数不符
return ResponseEntity.badRequest().build(); // TODO 参数校验待完善
}
Boolean saveResult = itemService.updateItem(item, desc, itemParams);
if (saveResult) {
// 204 添加成功
return ResponseEntity.status(HttpStatus.NO_CONTENT).build();
} else {
// 500 发送异常
return ResponseEntity.status(HttpStatus.INTERNAL_SERVER_ERROR).build();
}
} catch (Exception e) {
e.printStackTrace();
}
// 500 发送异常
return ResponseEntity.status(HttpStatus.INTERNAL_SERVER_ERROR).build();
}```<p>但是默认情况下,PUT 请求是无法提交表单数据的,所以我们需要在 web.xml 中添加过滤器来解决,配置如下<code>:<br/></code></p>
</filter-mapping>1
2
但是还有一点需要注意,DELETE 请求同样是无法提交表单数据的,所以需要在 web.xml 中添加过滤器解决,配置如下:<code><br/></code></p>
当然,测试的时候也有小技巧:
</filter-mapping>```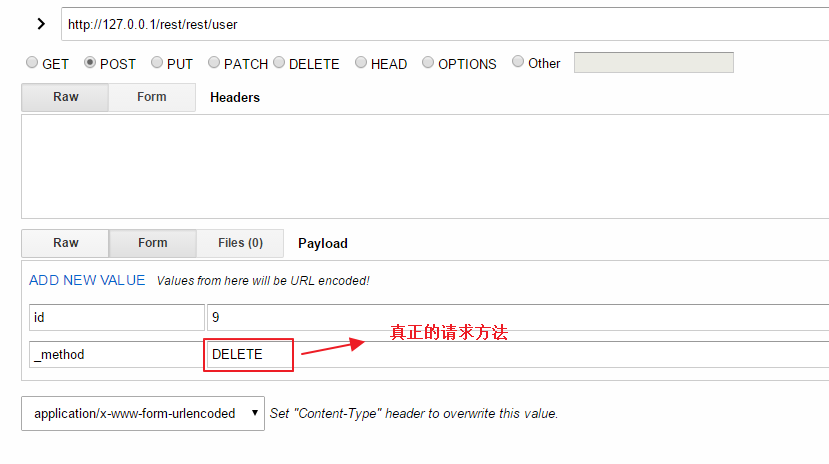
</p>